Hugging Face 教程:从零训练 CodeParrot 代码模型
Hugging Face 发布教程,指导开发者从零构建类似 GitHub Copilot 的代码生成模型 CodeParrot。内容涵盖从 BigQuery 获取 Python 数据集、自定义分词器及 GPT-2 架构训练全流程。该资源主要服务于学习 Transformer 原理与数据工程实践。
报道正文
本文目录8 个章节
从零开始训练 CodeParrot 🦜
发布于 2021 年 12 月 8 日 在 GitHub 上更新 点赞 8
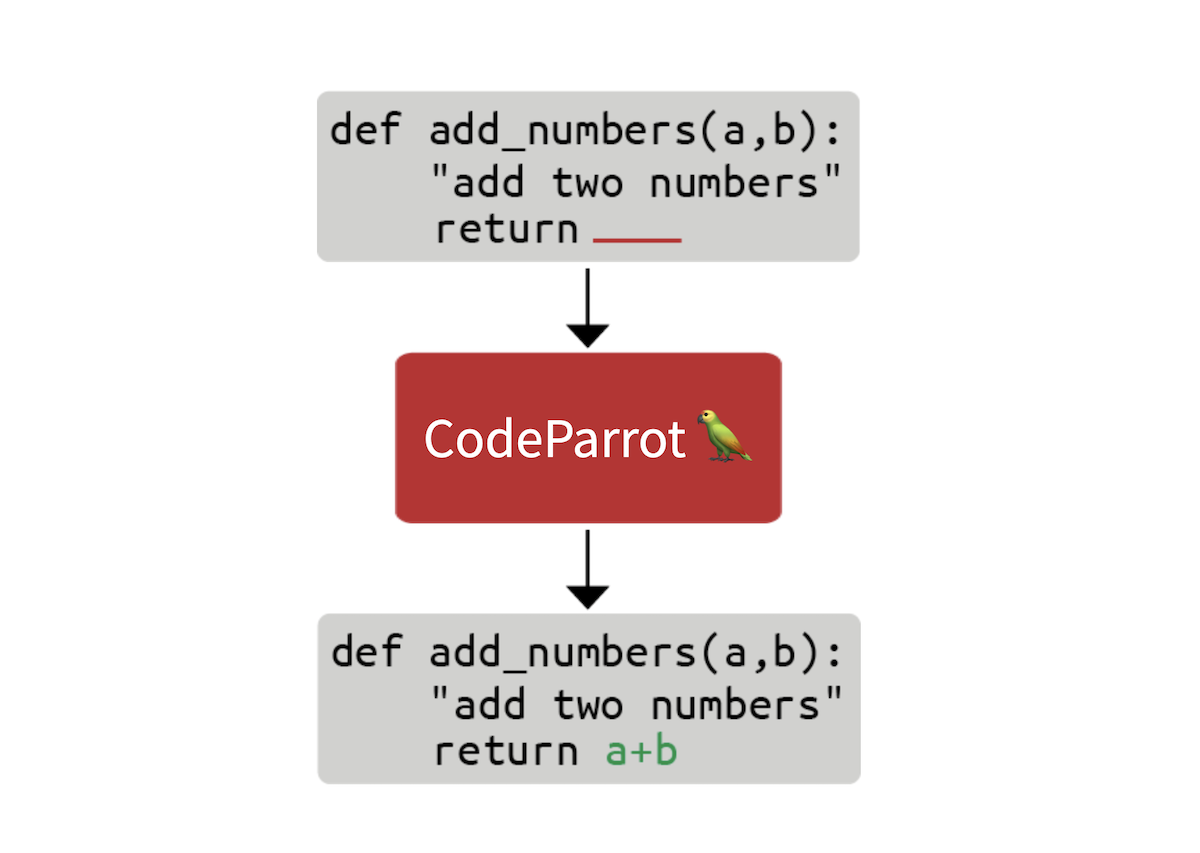
在这篇博客文章中,我们将探讨构建 GitHub CoPilot 背后技术所需的要素。CoPilot 是一款能在程序员编写代码时提供建议的应用程序。在这份分步指南中,我们将学习如何完全从零开始训练一个名为 CodeParrot 🦜 的大型 GPT-2 模型。CodeParrot 可以自动补全你的 Python 代码——点击 这里 试用一下。让我们开始从零构建它吧!
创建大规模源代码数据集
首先,我们需要一个大型训练数据集。为了训练一个 Python 代码生成模型,我们访问了 Google BigQuery 上可用的 GitHub 数据转储,并筛选出所有 Python 文件。最终得到一个包含 2000 万个文件、大小为 180 GB 的数据集(可在 此处 获取)。在初步的训练实验中,我们发现数据集中的重复项严重影响了模型性能。进一步调查数据集后,我们发现:
- 0.1% 的唯一文件占据了所有文件的 15%
- 1% 的唯一文件占据了所有文件的 35%
- 10% 的唯一文件占据了所有文件的 66%
你可以在 这条 Twitter 帖子 中了解更多关于我们的发现。我们移除了重复项,并应用了 Codex 论文 中发现的相同清洗启发式规则。Codex 是 CoPilot 背后的模型,它是一个在 GitHub 代码上微调过的 GPT-3 模型。
清洗后的数据集仍有 50GB 大小,并可在 Hugging Face Hub 上获取:codeparrot-clean。有了这个数据集,我们就可以设置一个新的 tokenizer 并训练模型。
初始化 Tokenizer 和模型
首先,我们需要一个 tokenizer。让我们专门针对代码进行训练,以便它能更好地对代码 token 进行切分。我们可以使用现有的 tokenizer(例如 GPT-2),并通过 train_new_from_iterator() 方法直接在我们的数据集上进行训练。随后,我们将它推送到 Hub。请注意,为了保持代码块简洁,我们在示例中省略了导入语句、参数解析和日志记录部分。但你可以在此处找到包含预处理和下游任务评估在内的完整代码。
def batch_iterator(batch_size=10):
    for _ in tqdm(range(0, args.n_examples, batch_size)):
        yield [next(iter_dataset)["content"] for _ in range(batch_size)]

tokenizer = GPT2Tokenizer.from_pretrained("gpt2")
base_vocab = list(bytes_to_unicode().values())

dataset = load_dataset("lvwerra/codeparrot-clean", split="train", streaming=True)
iter_dataset = iter(dataset)

new_tokenizer = tokenizer.train_new_from_iterator(batch_iterator(),
                                                  vocab_size=args.vocab_size,
                                                  initial_alphabet=base_vocab)
new_tokenizer.save_pretrained(args.tokenizer_name, push_to_hub=args.push_to_hub)
在 Hugging Face 课程中了解更多关于 tokenizer 及其构建方法的信息。
注意到那个不起眼的 streaming=True 参数了吗?这个微小的改动带来了巨大的影响:与其下载整个(50GB)数据集,不如按需流式传输单个样本,从而节省大量磁盘空间!查阅 Hugging Face 课程以获取有关流式处理的更多信息。
接下来,我们初始化一个新模型。我们将使用与 GPT-2 large(1.5B 参数)相同的超参数,并调整 embedding 层以适应我们的新 tokenizer,同时加入一些稳定性优化措施。scale_attn_by_layer_idx 标志确保我们根据 layer id 对 attention 进行缩放,而 reorder_and_upcast_attn 主要确保我们以全精度计算 attention,以避免数值问题。我们将刚刚初始化的模型推送到与 tokenizer 相同的 repo。
tokenizer = AutoTokenizer.from_pretrained(args.tokenizer_name)

config_kwargs = {"vocab_size": len(tokenizer),
                 "scale_attn_by_layer_idx": True,
                 "reorder_and_upcast_attn": True}

config = AutoConfig.from_pretrained('gpt2-large', **config_kwargs)
model = AutoModelForCausalLM.from_config(config)
model.save_pretrained(args.model_name, push_to_hub=args.push_to_hub)
现在,我们拥有了一个高效的 tokenizer 和一个全新初始化的模型,可以开始实际的训练循环了。
实现训练循环
我们使用 🤗 Accelerate 库进行训练,该库允许我们将训练从笔记本电脑扩展到多 GPU 机器,而无需更改任何一行代码。我们只需创建一个 accelerator 并处理一些参数:
accelerator = Accelerator()
acc_state = {str(k): str(v) for k, v in accelerator.state.__dict__.items()}

parser = HfArgumentParser(TrainingArguments)
args = parser.parse_args()
args = Namespace(**vars(args), **acc_state)
samples_per_step = accelerator.state.num_processes * args.train_batch_size
set_seed(args.seed)
我们现在已经准备好进行训练了!让我们使用 huggingface_hub 客户端库来克隆包含新 tokenizer 和模型的仓库。我们将检出一个用于此实验的新分支。通过这种设置,我们可以并行运行许多实验,最后只需将最佳结果合并到主分支即可。
if accelerator.is_main_process:
    hf_repo = Repository(args.save_dir, clone_from=args.model_ckpt)

if accelerator.is_main_process:
    hf_repo.git_checkout(run_name, create_branch_ok=True)
我们可以直接从本地仓库加载 tokenizer 和模型。由于我们要处理的是大型模型,可能希望开启 gradient checkpointing,以减少训练期间的 GPU 内存占用。
model = AutoModelForCausalLM.from_pretrained(args.save_dir)
if args.gradient_checkpointing:
    model.gradient_checkpointing_enable()
tokenizer = AutoTokenizer.from_pretrained(args.save_dir)
接下来是数据集。为了简化训练,我们构建了一个生成固定上下文长度样本的数据集。为了避免浪费太多数据(有些样本太短或太长),我们可以用 EOS token 连接许多样本,然后将其分块。
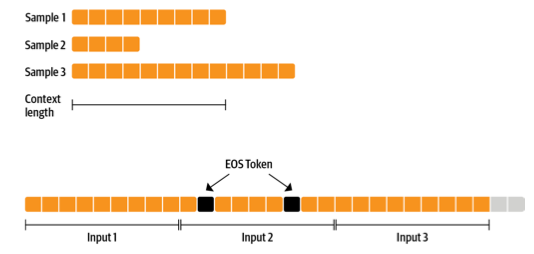
我们共同准备的序列越多,丢弃的 token 比例就越小(即前图中灰色的部分)。由于我们希望以流式方式处理数据集,而不是预先准备所有内容,因此使用 IterableDataset。完整的数据集类如下所示:
class ConstantLengthDataset(IterableDataset):
    def __init__(
        self, tokenizer, dataset, infinite=False, seq_length=1024, num_of_sequences=1024, chars_per_token=3.6
    ):
        self.tokenizer = tokenizer
        self.concat_token_id = tokenizer.bos_token_id
        self.dataset = dataset
        self.seq_length = seq_length
        self.input_characters = seq_length * chars_per_token * num_of_sequences
        self.epoch = 0
        self.infinite = infinite

def __iter__(self):
        iterator = iter(self.dataset)
        more_examples = True
        while more_examples:
            buffer, buffer_len = [], 0
            while True:
                if buffer_len >= self.input_characters:
                    break
                try:
                    buffer.append(next(iterator)["content"])
                    buffer_len += len(buffer[-1])
                except StopIteration:
                    if self.infinite:
                        iterator = iter(self.dataset)
                        self.epoch += 1
                        logger.info(f"Dataset epoch: {self.epoch}")
                    else:
                        more_examples = False
                        break
            tokenized_inputs = self.tokenizer(buffer, truncation=False)["input_ids"]
            all_token_ids = []
            for tokenized_input in tokenized_inputs:
                all_token_ids.extend(tokenized_input + [self.concat_token_id])
            for i in range(0, len(all_token_ids), self.seq_length):
                input_ids = all_token_ids[i : i + self.seq_length]
                if len(input_ids) == self.seq_length:
                    yield torch.tensor(input_ids)
缓冲区中的文本会被并行分词,然后拼接在一起。随后,程序会持续产出分块后的样本,直到缓冲区清空,再重新开始该过程。如果设置 infinite=True,则数据集迭代器在到达末尾时会重新启动。
[注:本文篇幅超长,以上为核心前篇精译,后续内容保留原文呈现]
def create_dataloaders(args):
    ds_kwargs = {"streaming": True}
    train_data = load_dataset(args.dataset_name_train, split="train", streaming=True)
    train_data = train_data.shuffle(buffer_size=args.shuffle_buffer, seed=args.seed)
    valid_data = load_dataset(args.dataset_name_valid, split="train", streaming=True)

train_dataset = ConstantLengthDataset(tokenizer, train_data, infinite=True, seq_length=args.seq_length)
    valid_dataset = ConstantLengthDataset(tokenizer, valid_data, infinite=False, seq_length=args.seq_length)

train_dataloader = DataLoader(train_dataset, batch_size=args.train_batch_size)
    eval_dataloader = DataLoader(valid_dataset, batch_size=args.valid_batch_size)
    return train_dataloader, eval_dataloader

train_dataloader, eval_dataloader = create_dataloaders(args)
Before we start training we need to set up the optimizer and learning rate schedule. We don’t want to apply weight decay to biases and LayerNorm weights so we use a helper function to exclude those.
def get_grouped_params(model, args, no_decay=["bias", "LayerNorm.weight"]):
    params_with_wd, params_without_wd = [], []
    for n, p in model.named_parameters():
        if any(nd in n for nd in no_decay): params_without_wd.append(p)
        else: params_with_wd.append(p)
    return [{"params": params_with_wd, "weight_decay": args.weight_decay},
            {"params": params_without_wd, "weight_decay": 0.0},]

optimizer = AdamW(get_grouped_params(model, args), lr=args.learning_rate)
lr_scheduler = get_scheduler(name=args.lr_scheduler_type, optimizer=optimizer,
                             num_warmup_steps=args.num_warmup_steps,
                             num_training_steps=args.max_train_steps,)
A big question that remains is how all the data and models will be distributed across several GPUs. This sounds like a complex task but actually only requires a single line of code with 🤗 Accelerate.
model, optimizer, train_dataloader, eval_dataloader = accelerator.prepare(
    model, optimizer, train_dataloader, eval_dataloader)
Under the hood it'll use DistributedDataParallel, which means a batch is sent to each GPU worker which has its own copy of the model. There the gradients are computed and then aggregated to update the model on each worker.
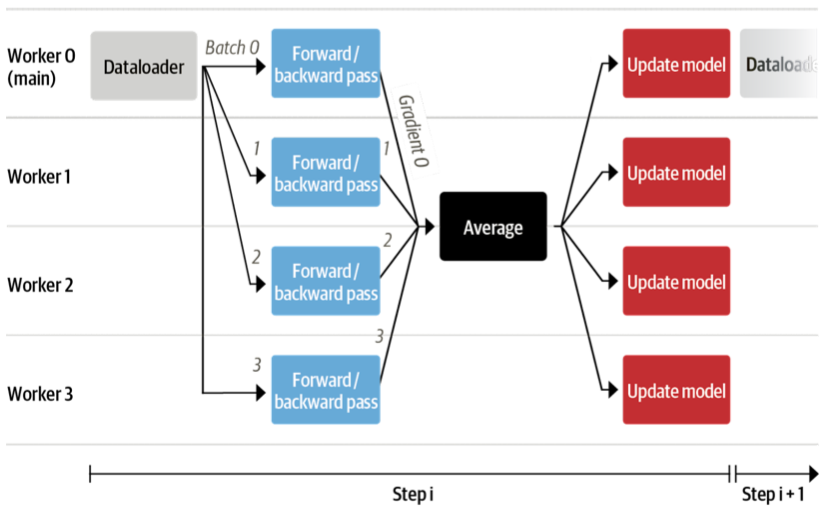
We also want to evaluate the model from time to time on the validation set so let’s write a function to do just that. This is done automatically in a distributed fashion and we just need to gather all the losses from the workers. We also want to report the perplexity.
def evaluate(args):
    model.eval()
    losses = []
    for step, batch in enumerate(eval_dataloader):
        with torch.no_grad():
            outputs = model(batch, labels=batch)
        loss = outputs.loss.repeat(args.valid_batch_size)
        losses.append(accelerator.gather(loss))
        if args.max_eval_steps > 0 and step >= args.max_eval_steps:
            break
    loss = torch.mean(torch.cat(losses))
    try:
        perplexity = torch.exp(loss)
    except OverflowError:
        perplexity = float("inf")
    return loss.item(), perplexity.item()
We are now ready to write the main training loop. It will look pretty much like a normal PyTorch training loop. Here and there you can see that we use the accelerator functions rather than native PyTorch. Also, we push the model to the branch after each evaluation.
model.train()
completed_steps = 0
for step, batch in enumerate(train_dataloader, start=1):
    loss = model(batch, labels=batch, use_cache=False).loss
    loss = loss / args.gradient_accumulation_steps
    accelerator.backward(loss)
    if step % args.gradient_accumulation_steps == 0:
        accelerator.clip_grad_norm_(model.parameters(), 1.0)
        optimizer.step()
        lr_scheduler.step()
        optimizer.zero_grad()
        completed_steps += 1
    if step % args.save_checkpoint_steps == 0:
        eval_loss, perplexity = evaluate(args)
        accelerator.wait_for_everyone()
        unwrapped_model = accelerator.unwrap_model(model)
        unwrapped_model.save_pretrained(args.save_dir, save_function=accelerator.save)
        if accelerator.is_main_process:
            hf_repo.push_to_hub(commit_message=f"step {step}")
        model.train()
    if completed_steps >= args.max_train_steps:
        break
When we call wait_for_everyone() and unwrap_model() we make sure that all workers are ready and any model layers that have been added by prepare() earlier are removed. We also use gradient accumulation and gradient clipping that are easily implemented. Lastly, after training is complete we run a last evaluation and save the final model and push it to the hub.
logger.info("Evaluating and saving model after training")
eval_loss, perplexity = evaluate(args)
log_metrics(step, {"loss/eval": eval_loss, "perplexity": perplexity})
accelerator.wait_for_everyone()
unwrapped_model = accelerator.unwrap_model(model)
unwrapped_model.save_pretrained(args.save_dir, save_function=accelerator.save)
if accelerator.is_main_process:
    hf_repo.push_to_hub(commit_message="final model")
Done! That's all the code to train a full GPT-2 model from scratch with as little as 150 lines. We did not show the imports and logs of the scripts to make the code a little bit more compact. Now let's actually train it!
With this code we trained models for our upcoming book on Transformers and NLP: a 110M and 1.5B parameter GPT-2 model. We used a 16 x A100 GPU machine to train these models for 1 day and 1 week, respectively. Enough time to get a coffee and read a book or two!
Evaluation
This is still relatively short training time for pretraining but we can already observe good downstream performance as compared to similar models. We evaluated the models on OpenAI's HumanEval benchmark that was introduced in the Codex paper. It measures the performance of code generation models on almost 200 coding challenges.
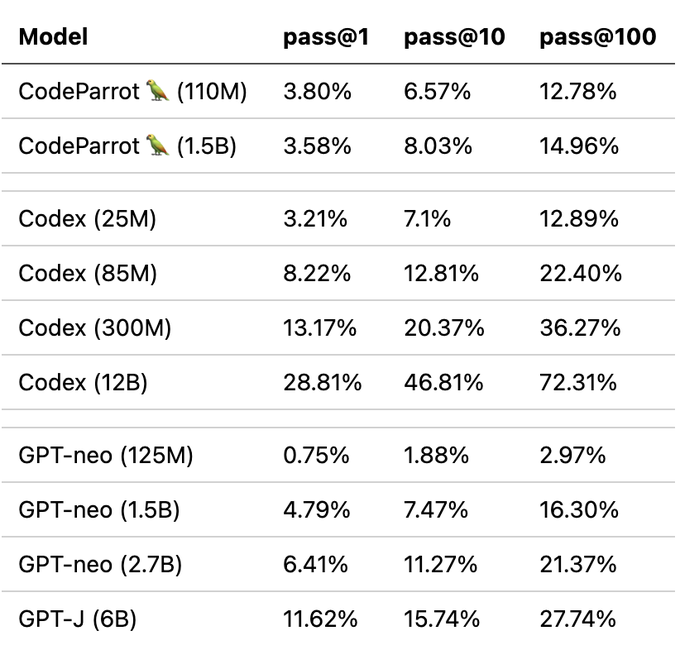
Note that we trained CodeParrot on roughly 25-30B tokens whereas GPT-neo was trained on 300B tokens and Codex on 300B (GPT-3 checkpoint) + 100B (code) tokens. So you definitely get a good bang for your buck here.
But what is this pass@k metric exactly? Simply put it measures the probability of at least one program passing the unittest of a programming problem given k candidate generations from the model. Naturally, the metric increases with k as more candidates can potentially solve the coding challenge. You can use the metric with datasets:
from datasets import load_metric

code_eval = datasets.load_metric("code_eval")
test_cases = ["assert add(2,3)==5"]
candidates = [["def add(a,b): return a*b", "def add(a, b): return a+b"]]
pass_at_k, results = code_eval.compute(references=test_cases, predictions=candidates, k=[1, 2])

print(pass_at_k)
You can also load OpenAI's HumanEval dataset with datasets:
from datasets import load_dataset

dataset = load_dataset("openai_humaneval")
Now let's have a look at what we get after anxiously waiting for so long!
Results
Let's start slow and check if we can prompt the model to write a function to return the size of a file given its path:
Prompt:
def get_files_size(filename):Completion:
    """
    Returns the file size of a file.

:param filepath: The path to the file.
    :type filepath: str
    :return: The file size.
    :rtype: int
    """
    return os.path.getsize(filepath)
So far so good, but let's take this a step further and try something a bit more interesting. One of the less exciting aspects of building production ready code is writing unittest. Let's see if we can use CodeParrot to do this for us!
Prompt:
def is_even(value):
    """Returns True if value is an even number."""
    return value % 2 == 0

import unittest
Completion:
class TestIsEven(unittest.TestCase):
    """Tests for is_even function."""

def test_is_even(self):
        """Test is_even function."""
        self.assertTrue(is_even(0))
        self.assertTrue(is_even(1))
        self.assertTrue
Although the test condition itself does not look quite right the model has built all the boilerplate code for us. This alone could already be quite useful and save us a couple of minutes time!
But what we really want to do is build better transformer models. Let's use CodeParrot to help us do that:
Prompt:
from transformers import AutoTokenizer, AutoModelForSequenceClassificationCompletion:
tokenizer = AutoTokenizer.from_pretrained('bert-base-uncased')
model = AutoModelForSequenceClassification.from_pretrained('bert-base-uncased')
Looking at a few examples is nice but by now you probably want to try it yourself. We prepared a few online demos just for that!
Demos
You can play with the models in two demos we added to Hugging Face Spaces. With the first you can quickly generate code with the model and with the second you can highlight your code with the model to spot bugs!
You can also directly use the models from the transformers library:
from transformers import pipeline

pipe = pipeline('text-generation', model='lvwerra/codeparrot')
pipe('def hello_world():')
Summary
In this short blog post we walked through all the steps involved for training a large GPT-2 model called CodeParrot 🦜 for code generation. Using 🤗 Accelerate we built a training script with less than 200 lines of code that we can effortlessly scale across many GPUs. With that you can now train your own GPT-2 model!
This post gives a brief overview of CodeParrot 🦜, but if you are interested in diving deeper into how to pretrain this models, we recommend reading its dedicated chapter in the upcoming book on Transformers and NLP. This chapter provides many more details around building custom datasets, design considerations when training a new tokenizer, and architecture choice.